Advanced Excel Import Engine |
  
|
Advanced Excel Import Engine |
|
HIPAA Claim Master now has an advanced import engine to further streamline the import process. This tool leverages a comprehensive validation framework, which ensures the integrity of imported data by checking the data's structure, length, type, and even the relationships between different records across various rows. Heres a summary of the features for the Advanced Import Engine:
oProcesses diverse data types and manage special encoding characters while cleaning all incoming data.
oDelivers efficient handling of thousands of rows.
oSupports dynamic columns, enabling the application to bypass non-essential columns unless explicitly required.
Follow the steps below to import data this way:
1.Go to SpreadSheet(Import/Export) > Advanced Import Engine in the main menu window.
\" tab.")
The "Advance Import Engine" option is under the "SpreadSheet(Import/Export)" tab.
The following window will open:

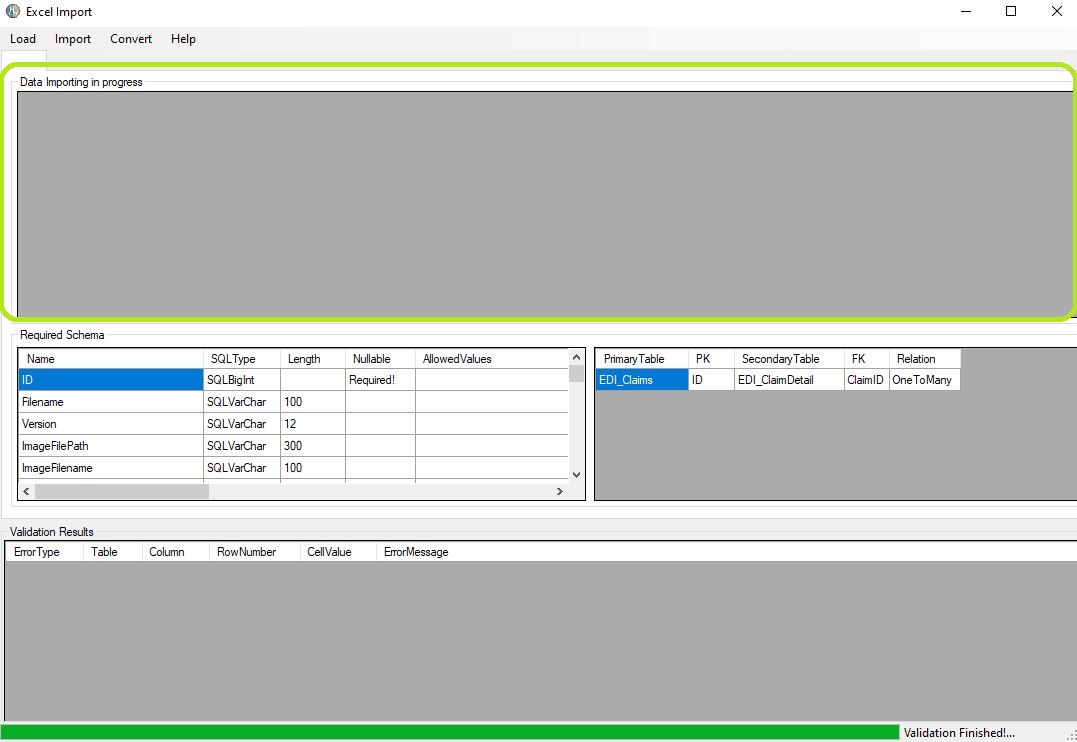
The Excel Import window.
2.There are four tabs at the top-left side of the window: Load, Import, Convert, and Help:
oLoad Choose a file to validate and upload or choose a sample file for testing.
oImport Once a file is validated successfully, you will have the option to import the file to the database.
oConvert Choose to either convert a file to CSV or Excel.
oHelp Different options with guidelines regarding the data and documentation.

The tab bar with the Load, Import, "Convert," and Help tabs.
3.Make your selection of which action you want to take. Depending on what you choose you will see the different results and processes in the three view boxes:
oData Importing in progress This box shows the progress of validating the file and the lines of the EDI_Claims and EDI_ClaimDetail.
oRequired Schema Shows the required data and format for a valid 837.
oValidation Results If there are any data or format errors within the spreadsheet, they will be displayed here.

The data viewing boxes in the Excel Import window.
4.After you are done, close the window.
See the descriptions of each tab and their respective options below.

The Load tab options.
Within the Load tab, you will find four options:
oImport Sheet This option will open a browsing window so you can locate the spreadsheet you want to load. The process will begin automatically after clicking Open.

The data viewing boxes with the results.
oImport Sheet Without Display (Faster) This option will open a browsing window so you can locate the spreadsheet you want to load. The process will begin automatically after clicking Open. This option will not display spreadsheet information on screen.
If there are no errors detected during the verification, a pop-up window will be displayed informing you of this.
oClean Sample File This option will load a sample file which contains no errors. After its done, a pop-up window will say you are ready for the import process. You will also see the data in the viewing boxes.

The pop-up window confirming the data has no errors.
oSample File With Errors This option will load a sample file which contains errors. After its done, you will see the data in the viewing boxes, including the list of errors and the respective details under the Validation Results box.
Errors will be listed under the Validation Results box.

The Import tab option.
Once the file has passed validation, the system permits you to upload the data to the database in the Import to Database option. This process ensures that the imported data integrates seamlessly with the application and adheres to all necessary standards and relationships. Once the process is complete, you will receive a pop-up window saying that the import to the database was successful.

The pop-up window comfirming the data was imported.

The "Convert" tab options.
Within the "Convert" tab, you will find two options:
oCSV to Excel This option will allow you to turn a CSV file into an Excel file for import.
oExcel to CSV This option will allow you to turn an Excel file into a CSV file for import.

The Help tab options.
With the Help tab, you will find five options:
·Show Documentation This option will open an Excel spreadsheet that outlines all the possible fields that can be mapped or filled out, along with their corresponding fields in the EDI file. Understanding these mappings is crucial, as it provides guidance on how to populate the correct fields in the EDI side and clarifies what each field represents. Additionally, the documentation provides important metadata, such as allowed values for specific fields, SQL data types, and any constraints related to field length and requirements.

The window displayed after clicking Show Documentation.
oAllowed Values This option will display a list of all the allowed values for specific fields when populating your data.

The Allowed Values shows a list of valid values for import spreadsheets.
oGenerate Template This option will create a blank spreadsheet that you can name and use on a regular basis. The template can be filled with new data for each upload.

The "Generate Template" option has the "Excel Template" and CSV Template" options.
When you click this option, a window will open to allow you to select where you want to save the template spreadsheet. After you click Save, a new window will open, showing the location where you can open the spreadsheet.

The payments template to fill window will allow you to select where you want to save your template.

A window will open showing the location of the template spreadsheet.
oSchema Not applicable for HIPAA Claim Master. There are only two tables in the schema and both displayed in the "Required Schema" window.
oTables Relations This option will show a logical representation of data spread across multiple tables. For example, in the case of claims data, the 'EDI_Claims' table contains claim information, while the 'EDI_ClaimDetail' table holds individual service line details. This forms a one-to-many relationship, meaning a single claim can have multiple service lines, but each service line is linked to only one claim.
Once the data is imported, the application will generate new IDs where required but will retain these relationships to ensure the integrity of the data. Properly maintaining these linkages ensures smooth functionality within the application and prevents data inconsistencies.
By following this structured process and utilizing the new import engine, users can efficiently import complex data sets with minimal errors and greater flexibility. The engine's enhanced features make it a valuable tool for handling extensive Excel and CSV imports while maintaining the integrity of data relationships.
When importing a file, you will sometimes find validation errors within the Validation Results box. These errors are flagged by the system to ensure that the information being imported is accurate and will not cause issues during run time. Below are several common validation errors and how they can be addressed:
oStructure Validation Error Failed to pass structure validation, Value '11/7/12994' in EDI_Claims.PatientDOB isn't in the correct format!
In this scenario, the 'PatientDOB' field in the 'EDI_Claims' table is expected to contain a valid date. The issue here is a typographical error'12994' should be '1994.' The application attempts to parse dates in multiple formats, but when it cannot, it assumes the input is incorrect.
oValue Length Validation Error Failed to pass values validation, value 'Moee' of length '4' in Column EDI_Claims.PayerState cannot exceed 2 characters.
In this scenario, the 'PayerState' field exceeds the allowed length of 2 characters and contains an invalid value. Fields like these must adhere to both length restrictions and permissible value lists.
oValue Restriction Error Failed to pass values validation, Value '318' in EDI_Claims.PatientRelationship is not allowed. Only (01, 18, 19, 20, 21, 39, 40, 53, G8) are accepted!
In this scenario, the 'PatientRelationship' field must match one of the predefined values. This ensures consistency and compatibility with system requirements.
oOrphan Record Error Orphan record detected, FK EDI_ClaimDetail.ClaimID with value '2227' was not found as PK EDI_Claims.ID.
In this scenario, this error occurs when a record in the 'EDI_ClaimDetail' table references a non-existent record in the 'EDI_Claims' table. Such a relationship error suggests that either a claim is missing, or there is an incorrect link between the tables. A claim detail, or line, cannot exist without a corresponding claim to which it is attached.
Each of these validation errors can be corrected by reviewing and adjusting the data. The system allows you to recheck the file after corrections have been made, ensuring all issues are resolved before finalizing the import.