|
<< Click to Display Table of Contents >> Custom File Naming Conventions |
  
|
|
<< Click to Display Table of Contents >> Custom File Naming Conventions |
|
Health Insurance Exchanges (HIX) demand carriers adhere to file naming conventions. These conventions enable a reader to quickly determine the date, time, sender, recipient, and other specific details of a particular file without opening them individually. The "Custom File Naming Convention" option enables you to create a scheme tailored to your or your Trading Partner's requirements.
Follow the steps below to create your custom file naming conventions:
1.Go to EDI Exchange > Trading Partners in the main menu window.

The "Trading Partners" option is under the "EDI Exchange" tab.
The following window will open:

The "Trading Partners" window.
2.Go to the "Folders" tab, then click the drop-down menu under the "File Naming Convention" box.

The "Folders" tab.

The drop-down menu in the "File Naming Convention" box.
3.When you select the "Custom" option, click the "Custom File Naming" button.

The "Custom File Naming" button will be enabled when you select the "Custom" option.
The following window will open:

The "Customize File Name" window.
4.The "Customize File Name" window contains the conventions you can customize per your or your Trading Partners' needs. Once you make all your selections, click "Save file name" to keep your name changes, then on the "Save" button of the Trading Partners window to save all your settings.

The "Save file name" button is in the "Customize File Name" window.
See the section below for the different actions you can take and the details to make your customizations. We will use the 837 file type to illustrate how you can create file names, as shown in the previous image. However, all HIPAAsuite products, including TA1s, 277CAs, and 999s, can have their respective file naming conventions applied to each Trading Partner.

The "File Name for" drop-down menu.
You may select the type of file name for customization from the drop-down menu. The file names available will depend on the HIPAAsuite product used to create the file naming convention.

This is an example of click-dragging an element into a new position.
In the "File Name Parts" box, you can create a coherent file naming convention by clicking and dragging elements in your desired order. You can add parts from the "Available additional file name parts" section. You can also remove any part from the file name parts box by clicking the "X" on the right side, as shown below:

Adding a file name part by dragging it to the file name parts box.

Click the "X" to remove the file naming element.

The "Restore default file name" button.
To discard any changes made and start over with the default file naming convention, click the "Restore default file name" button.
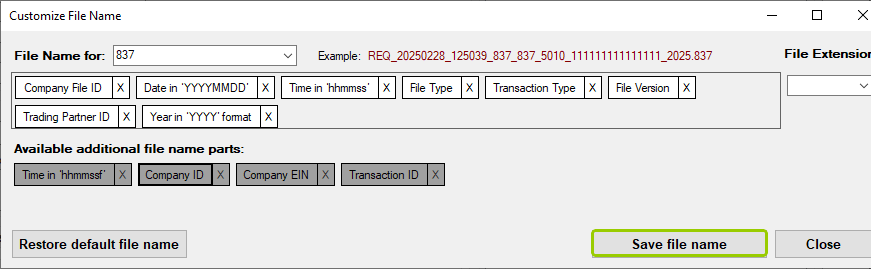
To keep the file naming convention you created or the changes you may have made, click "Save file name" before closing the window.