|
<< Click to Display Table of Contents >> Spreadsheet Import Setup |
  
|
|
<< Click to Display Table of Contents >> Spreadsheet Import Setup |
|
The HIPAA Authorizer application has a specific module that can be licensed to import spreadsheets. This section will go over the initial setup for the importing of spreadsheets and saving your preferred settings.
To begin the setup, follow the steps below:
1.Go to Database > Excel Import Setup in the main menu window.

The "Excel Import Setup" option from the "Database" tab.
The following window will open:

The "Import claims from excel or text file: setup" window.
2.Make your preferred selections, then click on the "Save Field Configuration" button.

The "Save Field Configuration" button.
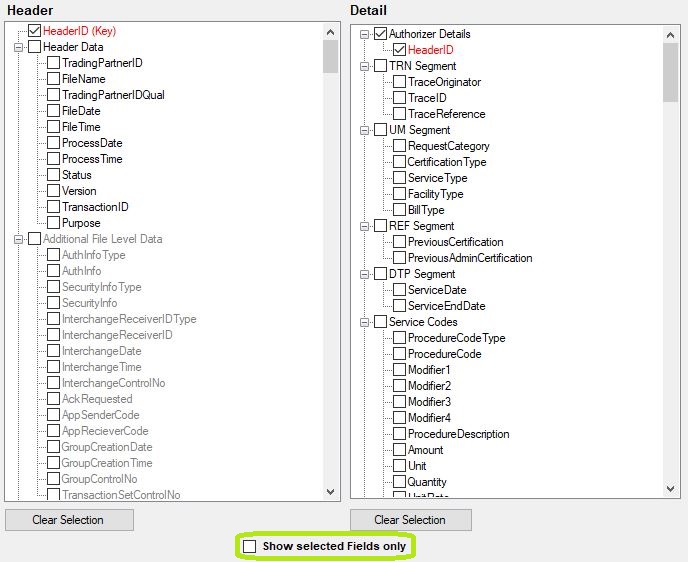
There are three classifications of fields:
Fields marked with RED color are mandatory. All required fields are selected by default.
Fields in BLACK are normal. The user can select a field for inclusion upon completing the import.
Claims are stored in two tables by default which are connected by an ID field: Header (EDI_Claims) and Detail (EDI_ClaimDetail). See the different actions you can take to configure your Header and Detail sheets:
Select All
Clicking on this button will select all fields of that section.
Clear
Clicking on this button removes all selected fields except mandatory fields.
Show Selected Fields Only
Checking this box will filter out all the unselected options, leaving only the checked fields. If left unchecked, all fields will be visible whether they're selected or not.
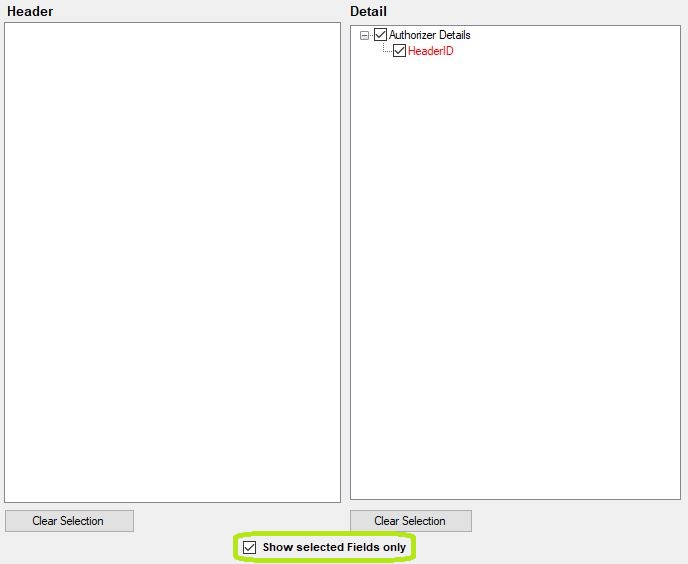
The "Header" and "Detail" fields when "Show selected Fields only" is unchecked and checked.

The two file format types are .xlsx and .csv.
You may determine the format type when creating an empty file. There are two options: .xlsx and .csv. You may also determine whether to create a single-sheet file or a multiple sheet file. This option is only available when you select field type as Excel (.xlsx).
You may select single sheet or multiple sheets.
The "Create Multiple Sheet" option creates an Excel file with two worksheets within a workbook named Header and Detail.
.")
Sample Excel file with multiple sheets (Header and Detail).
The "Create Single Sheet" option creates an Excel file with only one worksheet within a workbook. This file will contain both Header and Detail fields within it.

Sample Excel file with a single sheet.
Save Field Configuration
This action checks whether all mandatory fields are selected or not. If not, a pop-up window will warn you if something is missing:

Pop-up warning message if a mandatory field is not selected.
If all the fields are properly selected, clicking this button will save the configuration and a pop-up window will confirm a successful save:

Pop-up message if the configuration was a success.
This button will generate an empty import file based on the saved configurations. This action validates the mandatory fields. If the validation is successful, the application will create a file for import process based on selected configuration on screen. You will be prompted to select where to save the file:

Select the location to save the spreadsheet.
Once you save on the location of your choosing click "Save." A pop-up window will open confirming the successful file creation.

Pop-up confirming the creation of the spreadsheet.
If you want to stop the process without saving the changes, click the "Cancel" button.
Help
If you need further assistance, you may click on the "Help" button to open the user manual.
The application will check that the Excel file fields match those established during the spreadsheet import configuration. In the example below, we configured the spreadsheet to have the "Filename" field included, but left the selection unchecked.

The "Import claims from excel or text file: setup" with the "Filename" unchecked.

The Excel file along with the "Filename" field included.
Once you upload the Excel with the "Filename" field, click "Go," which will prompt a warning stating there is an invalid field.

An error pop-up message will state there is an invalid field.