Selecting a Code Set |
  
|
Selecting a Code Set |
|
EDI relies on transaction code sets. These codes represent longer explanations and descriptions.
The code sets are stored in the file codesets.xml in the Configuration subdirectory:
oThis PC\Window (C:)\ProgramData\HIPAAsuite\HIPAA Claim Status Checker\Configuration

Path to the Configuration folder for the codesets.xml file.
Note: The folder may be hidden.
To view and/or edit transaction code sets in the HIPAA Claim Status Checker application, follow the steps below:
1.Go to the "CodeSets" tab in the main menu window.

The "CodeSets" tab and its sub-menus.
2.Hover the pointer over one of the sub-menus, then select your desired code set name. The following items are available per sub-menu:
A to E |
|
Claim Status Category Codes |
Claim Status Codes |
Entity Codes |
Entity ID |
F to P |
|
Gender Codes |
ID |
ID Codes |
Payment Method |
Provider Taxonomy |
Provider Type |
Q to Z |
|
REF Codes |
Relationship Codes |
ServiceID |
TransactionType |
The following screenshot illustrates how to select the "Gender Codes" code set for display.

The "Gender Codes" option is under the "F to P" sub-menu.
3.The code set configuration window will open.

The "Gender Codes" code set window.
4.Once done, click "Save" if you have made any changes or "Close" if you want to exit. If you need more information, click "Help."
See the descriptions of the tools and actions you can find and perform, respectively, in the transaction code set lists:
This shows the total number of codes; in this example, the "Gender Codes" code set has 3 total codes.
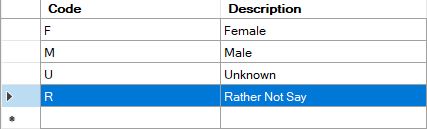
The codes are indicated in the source EDI files. The descriptions are displayed instead of codes, making files easier to read. For example, for the "Gender Codes" code set, these are the codes and corresponding descriptions:
oF Female
oM Male
oU Unknown
To add a row, click on the last row; you will see an indicator in the first gray field.

The indicator is shown in the left column.
To edit, double-click the cell you want to change. You may also start typing to enter Edit mode as well. Clicking or moving outside this cell overwrites the cell contents with the new value. To make these changes permanent, click the "Save" button.

Click on the cell you want to write.
To delete a row, click the left margin. This action will highlight the whole row. Then, press the Delete key on your keyboard.
Now press the <DELETE> key on your keyboard.